
Part 2: the first milestone.
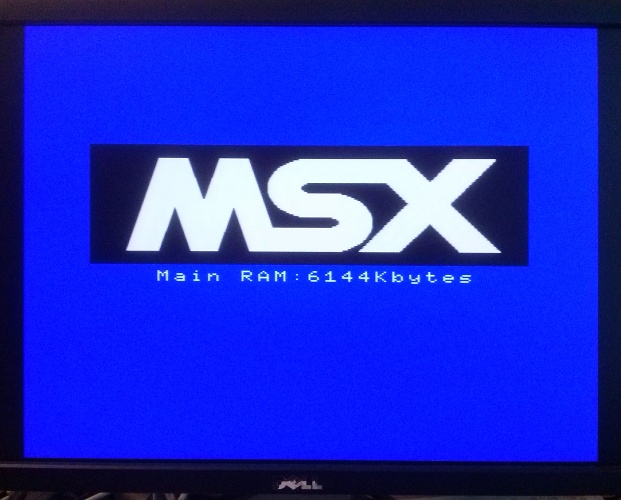
Today I have successfully booted OneChipMSX on the Turbo Chameleon 64!
To do this I’ve had to make some changes to the OneChipMSX source tree, and while I’d hoped that I’d be able to keep the main core pretty much untouched, and do the Chameleon-specific stuff externally, it hasn’t quite worked out that way.
The first problem I encountered was that the Chameleon has no EPCS4 configuration device, so I would need to load the BIOS from somewhere else. My choices were the Chameleon’s own flash, or SD card. The former option might seem like the most sensible choice at a quick glance, but it’s actually quite complicated, since the Chameleon has flash space for a number of different cores, so the BIOS’s location within flash would depend upon which flash slot contained the core! I thus chose loading from SD card, added an extra control CPU and simplified the Initial Program Loader.
The next problem was that the OneChipMSX clocks the SD card a little too fast for the Chameleon. Unlike most other SD-equipped FPGA boards, some of the SD card signals are routed through a CPLD inside the Chameleon which multiplexes a number of signals. This CPLD is responsible for accessing the C64 when the chameleon is in cartridge mode, so there’s a limit to how promptly SPI signals are forwarded to the SD card. Halving the OCMSX’s SPI clock speed seems to have done the trick (which is good because I haven’t yet figured out how to stall the T80 on SPI writes, so making the SPI clock slower still is currently not an option!)
Finally, the PS/2 keyboard posed a problem. The OCMSX source tree forwards bidirectional PS/2 clock and data signals into the heart of the core. This is in contrast to most other projects, which generally have separate in and out signals for clock and data, and merge them into their respective bidirectional signals in the toplevel. The Chameleon64, again, routes these signals through the MUX in a way that requires in and out signals to be separate in the toplevel, so I had to adjust the innermost PS/2 component and main MSX core accordingly.
With these changes, however, the core boots and works on both DE1 and Chameleon64 (though the cartridge slot signals that Caro’s DE1 port forwards to the GPIO headers on the DE1 are temporarily disabled.)
The BIOS is loaded from SD card rather than EPCS, which means you can upload the core on the fly via JTAG and it will work. You need an SD card (not SDHC) which needs to be FAT16 formatted, and which needs to contain the MSX2 bios from this page.
If you’re content to just play around in BASIC that should be all you need – otherwise you’ll want to add MSXDOS to the card – I’m told that Nextor can be used for this purpose, but haven’t yet had a chance to try it.
Full source is on GitHub (surprise, surprise!) while a binary .rbf file for the Chameleon can be found here: ChameleonOCMSX-20140825.zip. The repo is tagged at the appropriate point, too.
Please note, this is still very much experimental, and there’s a long way to go yet before it can be considered usable. Feel free to tinker with it, but don’t expect a fully-working, polished product!
Hi Alastair! how is going the MSX core progress? Best regards!
I’m currently short of time, but working on an OSD component which will make it possible to change the OCMSX’s DIP switch settings using the keyboard, since the Chameleon doesn’t have physical switches. There’s also a MIST port under construction, thanks to Till’s hard work in creating “legacy” components to support PS2 and raw SD card access.
Well, for 30 years old computers there it is no rush at all! Keep the good work when you have some time, best regards.
Thank-you so much for this core! Unfortunately I’m not able to make it work. The resolution seems to be fine with the monitor, but I can’t even see the splash screen. I can change the screenmode to a non-working one by pressing PrintScreen.
Mostly I just get a black screen, but by pressing the reset button I sometimes get single-colored screens (blue, cyan, green, light brown…). Some cards give more colorscreens, others just stay black :-).
I have flashed the core a couple of times (it’s in slot 3).
Cards are formatted as FAT16 as far as I can tell. I used Linux to make them and copy the files. I’ve tried a:
– Verbatim 2GB microSD with adapter (this one gives most colored screens :-))
– tried with a 2GB partition and two 1GB partitions – no visible difference
– PNY 512MB SD-card
– takeMS 2GB MMC PLUS
Also tried a SDHC just in case :-).
I have always copied bios_m2p.rom first, unmounted the card, mounted it again and then copied the rest of the files. The files either came from the links posted here or the Chameleon mailing list. All cards are detected and files seem fine in the Chameleon menu’s yellow file browser.
I have the Chameleon, Minimig and Spectrum cores working. Today I have been trying this in standalone mode. What could I be overlooking? Thanks!
The best advice I can give for now is to wait for the next release, because it’ll have an On Screen Display which will provide some debugging messages, which should help us figure out what’s going wrong.
Have you tried pressing the buttons on the Chameleon to reset the core? Someone said they needed to do that?
Yeah I was pressing everything on the Chameleon and on the keyboard as well. But: Horray! The new version just worked straight away :-).
That’s great news 🙂 This version is a little more persistent about initializing SD cards, but according to other reports there are still some that require a reset before they’ll work.
Tried a Kingston 2GB microSD today.
Also tried formatting the cards under Windows.
No change in outcome…