
A worked example…
Since I’ve been asked just how difficult it is to port a PACE arcade machine to the Chameleon, I figured a worked example would be useful! So what I’m going to do is document the process of getting Galaxian up an running. I’m going to assume you’re using Linux here. It’s all equally possible on Windows, but you’ll need to deal with things like getting an SVN client up and running, and I’m afraid I can’t help with that.
The first thing you need is a copy of the current PACE repository (Revision 1402 at the time of writing), so from a terminal, type:
svn checkout https://svn.pacedev.net/repos/pace
If all goes well you’ll have a new directory called “pace” with about 360 megabytes of stuff within. The two directories we’re interested in are sw/src and sw/synth. The first contains the VHDL implementation of the various arcade machine chips PACE needs to emulate, and also toplevels for each target board, and any other board-specific supporting logic that might be required.
The second contains certain device-specific implementations of things like dual-port RAMs emulated in FPGA BlockRAM, and also contains the actual project files for each combination of emulated platform and target board.
We can find all the existing ports of Galaxian in sw/synth/platform/galaxian/galaxian/
At the time of writing there are targets for cb, de1, de2, nb1, p2, p3m, rc10 and s5a_r2c0. The easiest way to port to a new target is to pick a similar device that already has a port, and adapt its port. The most important thing is that we pick a port that targets an Altera device, since the Cyclone III in the Chameleon is an Altera device, so for no very good reason other than it targetting a Cyclone II device, we’ll pick the p2 port. (With the benefit of hindsight, it’s a good idea to try building the project before you start, just to see whether it’s been maintained as the core of the project has evolved.)
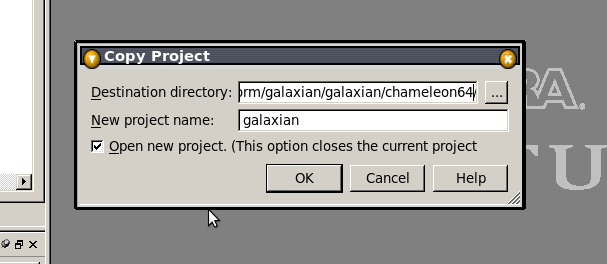
Use Quartus to open up the p2/galaxian.qpf file, and once it’s open, go to “Project -> Copy Project”.
In the Destination directory box, change “p2_copy” to “chameleon64” and hit OK.
Now we need to go through the list of project files, removing anything specific to the P2 board, such as ……/p2/target_pkg.vhd. We can also remove anything that mentioned “maple” or “gamecube”, since those are for interfacing console controllers, and we have no way of connecting those to the Chameleon.
Now here we hit a snag: if you click on any of the files that have relative paths, you’ll find that they won’t open, and you’ll get a “file not found” error. I presume what’s happened here is that the project’s been moved into a subdirectory at some point, so the relative paths now all have the wrong number of “../” in them. To fix this we could either painstakingly remove and re-add each file, or we can ignore the dire warnings at the head of the .qsf file and edit it manually. I’m going to do the latter.
Shut down Quartus (because editing the file while it’s open really would be asking for trouble), then open up galaxian.qsf in a text editor, and go a global search-and-replace, changing “../../../” to “../../../../” – i.e. changing three sets of dots to four. Open re-opening the project in Quartus you should now find that the files open up correctly.
Now we need to add target-specific files to the project. Go to “Project -> Add/Remove files in Project”, click the “..” button beside the filename box and navigate to pace/sw/src/target/chameleon64/ – and multi-select all the .VHD files in there. Add them to the project. We’re now about half way through the porting process!
Next we need to change the FPGA we’re targetting, since the P2 board used a Cyclone II and we’re using a Cyclone III. Go to “Assignments -> Device” and change “Family” to “Cyclone III”. (Yes, we want to remove assignments.)
Set the Pin Count to 144, to narrow down the available range, and select EP3C25E144C8. (Yes, again we want to remove assignments. Migration devices? Yeah, whatever – we don’t actually care…).
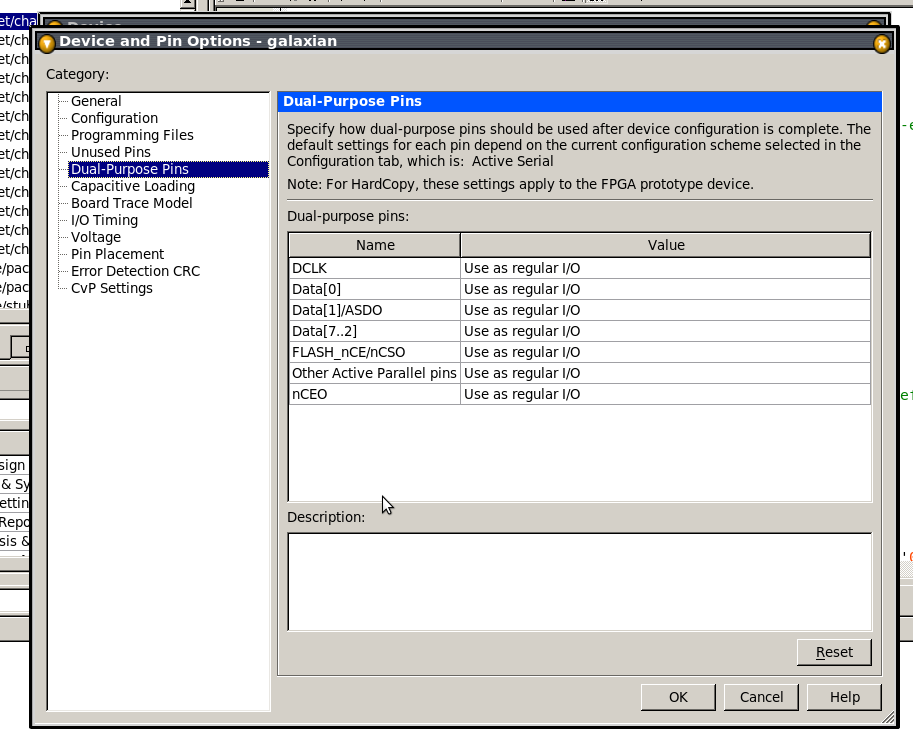
Now hit “Device and Pin options”, on the Voltage page set the default IO voltage to “3.3”, and on the Dual Purpose Pins page set everything to “Use as regular IO”.
One other thing we need to do: on the “Programming Files” page, enable “Raw Binary File (.rbf)”, since that’s the format Chaco prefers for flashing cores into the Chameleon.
Now Click OK until you’re back to the main Quartus Window.
Now we need to tell Quartus which pin does what. To avoid having to enter assignments manually we’ll use a .csv file which you can download here.
Go to “Assignments -> Import Assignments”, select the .csv file, and click OK.
We’re nearly there, now – we just need to take care of clocks. PACE doesn’t actually care all that much what the main clock frequency is, provided you set some constants correctly. The Chameleon, on the other hand, needs a clock of roughly 100MHz in order to read joystick events from the C64 or Docking Station, so we use a 100Mhz clock. We also need a secondary clock for video. The appropriate frequency depends on the video mode we’re using, but for 800×600@60Hz, it should be 40Mhz.
We need to create a PLL to generate these clocks from the Chameleon’s base 8MHz clock. To do this, go to “Tools -> Megawizard Plug-in Manager”, and select “Create a new custom megafunction variation”.
The filename should already be filled in with the correct path (i.e. the project’s own path), so just add to the end, “pllclk_ez” (without the quotes!), from the list of available megafunctions, unfold “IO” and select ALTPLL, then click next.
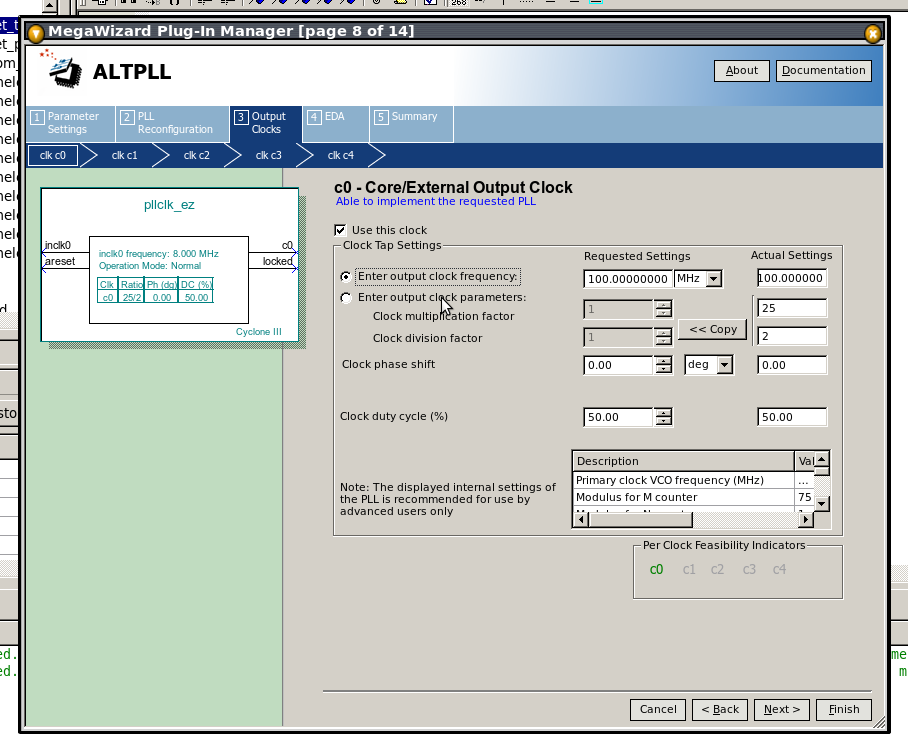
Change “inclk frequency” to 8 Mhz, then keep clicking next until you get to the page for configuring clock C0.
Simply select “Enter output clock frequency” and set the clock to 100Mhz, then click Next.
For clock C1, check the “Use this clock” box, and set the frequency to 40Mhz. Now click “Finish”.
Nearly there. Now all we have to do is change the clock multipliers, which are found in project_pkg.vhd (about the only file that doesn’t begin with loads of “../”).
We need to make sure that PACE_HAS_PLL is set to “true”, and that PACE_VIDEO_CONTROLLER_TYPE is set to PACE_VIDEO_VGA_800x600_60Hz; In both case this is already set the way we want it, so we only have to adjust PACE_CLK0_DIVIDE_BY, etc.
Everything’s referenced to the incoming 8MHz clock, so since we’ve used the PLL make CLK0 100Mhz, we need to inform the PACE framework. We’ve multiplied the clock by 100, and divided by 8, so cancelling down we can simplify that to multiplying by 25 and dividing by 2. So we set PACE_CLK0_MULTIPLY_BY to 25, and PACE_CLK0_DIVIDE_BY to 2.
Similarly, for CLK1, the video clock, we’ve multiplied by 40 and divided by 8, which cancels down simply to multiplying by 5, so we set PACE_CLK1_MULTIPLY_BY to 5, and PACE_CLK1_DIVIDE_BY to 1.
Finally we check that GALAXIAN_USE_INTERNAL_WRAM is set to true. This tells the project to emulate SRAM using the FPGA’s internal BlockRAM. The Chameleon doesn’t have any real SRAM.
In theory that’s it, so we do a test compile… and… oops – we hit an error:
Error (10482): VHDL error at project_pkg.vhd(56): object "ADV724_STD_PAL" is used but not declared
OK – double-click on the error, and we find a constant that’s not applicable to our target platform, and since it’s in the project-specific project_pkg file we can just comment it out by putting “–” (two dashes) before it.
Try again, and this time we hit:
Error (10481): VHDL Use Clause error at target_top.vhd(425): design library "work" does not contain primary unit "sigma_delta_dac"
OK – well that’s easy to fix – just add the file src/component/sound/sigma_delta_dac.vhd to the project, and try again…
Oops – another error!
Error (10334): VHDL error at bitmapctl.vhd(14): entity "bitmapCtl" is used but not declared/bitmapctl_e.vhd should do it.
Hmmm - I guess the bitmap controller is missing from the project? OK adding src/pace/video
And…. nope! Man, bit-rot must have set in with this one!
Error (10334): VHDL error at tilemapctl.vhd(18): entity "tilemapCtl" is used but not declared

Error (10481): VHDL Use Clause error at tilemapctl.vhd(9): design library "work" does not contain primary unit "platform_variant_pkg"
OK so we’ll add tilemapctl_e.vhd from the same place as the last fix, and also src/platform/galaxian/galaxian/platform_variant_pkg.vhd, and see what happens now…
OK yet another error:
Error (10887): VHDL error at video_mixer.vhd(33): elsif or else statement inside a generate statement is not supported in VHDL_1993, and is only supported for VHDL 2008
OK that’s easy to solve, just tell the compiler to accept VHDL 2008 constructs, by going to “Assignments -> Settings”, going to the “VHDL input” page and selecting “VHDL 2008”.
Fingers crossed…. Darn!
Error (10482): VHDL error at Graphics.VHD(88): object "PACE_VIDEO_H_SYNC_POLARITY" is used but not declared

Error (10482): VHDL error at Graphics.VHD(89): object "PACE_VIDEO_V_SYNC_POLARITY" is used but not declared
OK to fix that we just add the following two lines to project_pkg.vhd:
constant PACE_VIDEO_H_SYNC_POLARITY : std_logic := '1';

constant PACE_VIDEO_V_SYNC_POLARITY : std_logic := '1';
So are we there yet? No!
Error (10481): VHDL Use Clause error at Inputs.VHD(75): design library "work" does not contain primary unit "inputmapper"
OK – the inputmapper file got moved, it seems, so add src/platform/galaxian/galaxian/input_mapper.vhd to the project. While we’re at it we’ll add src/platform/galaxian/altera_mem.vhd too.
So we build the project again, and this time… success!…. sort of!
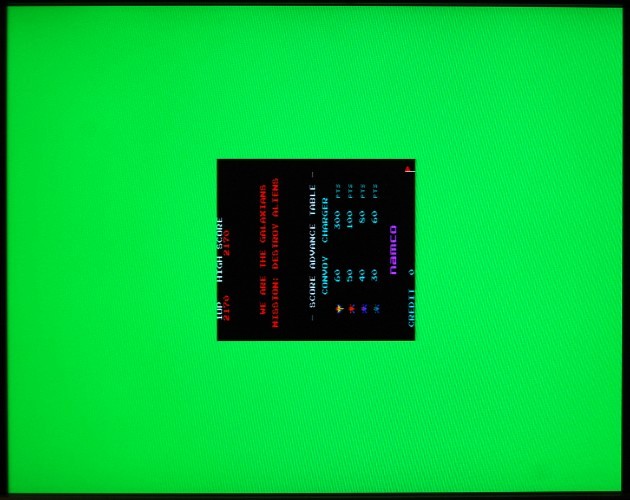
OK so what went wrong here? Well we’ve set the screen resolution to 800×600@60Hz, but the Galaxian screenmode is much smaller than that, so it gets centred within the field. We can expand the screen by changing scale factors in the project_pkg.vhd file:
constant PACE_VIDEO_H_SCALE : integer := 2;

constant PACE_VIDEO_V_SCALE : integer := 2;
But it still won’t fill the screen, so the other thing we can do is change the screenmode to 640×480@60Hz.
constant PACE_VIDEO_CONTROLLER_TYPE : PACEVideoController_t := PACE_VIDEO_VGA_640x480_60Hz;
But if we do that, we have to edit the PLL megafunction (using the MegaWizard Plugin Manager), and change C1 from 40Mhz to 25MHz – a more appropriate pixel clock for 640×480 mode. For the sake of completeness we’ll change the CLK1 scale factors in project_pkg.vhd too.
OK that’s more like it!
Well I seem to have picked the most difficult one to date for this guide, but that’s perhaps no bad thing. Binaries and source will follow later
Hey, lovely work on the TC64. I see the repository has already ports for Gameboy, NES, Neogeo and MSX!
Why don’t you give a try to one of those?
Also there is a Megadrive FPGAgen which works quite well:
http://fpgagen.googlecode.com/svn/trunk/
A number of the existing projects are designed for boards with SRAM – the Chameleon doesn’t have any, it only has SDRAM (albeit lots of it) which is much cheaper, but trickier to use. So yes, the other projects may be portable in time, but they’re not all trivial to bring to the Chameleon.
I got grom Greg a RBF file with Megadrive emulator. I tried with lots of roms and works great on TC64 but it doesnt emulate input and file reading is done by pressing the buttons on the TC64. Would that RBF be of any help?
Well I’d certainly be interested to see it, but I can’t make changes to it from an RBF file.
Merely porting the DE1 version isn’t trivial because it looks at a quick glance as though it uses SRAM for video, so to get it working on the TC64 Greg must have reworked that portion somewhat.
Good to know that there’s a working port though!
Can you get in touch with me via email. I can’t see how to reach you.