
Anyone remember CU Amiga Magazine’s “ProjectXG”? This was a DIY project they ran, based on a hack that was published on Aminet, to interface a Waveblaster MIDI daughterboard to the Amiga’s serial port, to provide a pretty good quality MIDI tone module.
The daughterboard most commonly used for this project was Yamaha’s DB50XG, though any card which attached to a “Waveblaster” header could be used. (Googling Waveblaster now, however, will find you a Yamaha product of quite a different nature.)
The DB50XG’s successor, the DB60XG was manufactured under license by NEC as the XR385, and this seems to be the easiest such card to find these days. It’s very similar to the DB50XG, it just has some very subtly different voicing, and can apply its DSP effects to incoming audio as well as its own sounds.
Having built a ProjectXG many years ago, then selling it a year or so back and promptly building another one, I naturally wanted to interface a Waveblaster card to one of my Minimig variants, and listen to some old MIDI files again.
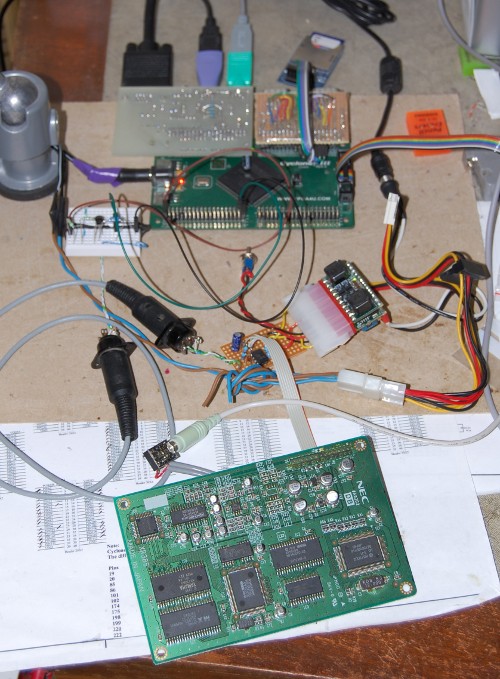
So what did I have to do to get this working? In the middle of the picture you can see a PicoPSU. These ingenious little devices are designed for powering small form factor computers, and will generate the various voltages required from a single 12v power source. In this instance, I’m using it to generate the +5v, +12 and -12v required by the XR385 in the foreground, and also taking +5v from the Molex connector to power the FPGA board in the background.
The stripboard attached to the ATX connector contains a bog-standard MIDI input stage – one resistor, one diode and an opto-isolator – and also a capacitor to provide a delayed reset pulse, without which the XR385 won’t start up.
The breadboard at the back contains a simple MIDI output stage – again very standard – just a BC547 driven by the FPGA pin. (Because the BC547 inverts the signal, I also invert it in the FPGA core – I couldn’t be bothered to rig up a second transistor and invert it on the breadboard!)
So here a few snippets of music played back using my own DeliMIDI player for Delitracker, the Minimig core and an XR385.
That’s great! Love it…I eventually got a AWE32 card for my pc…but until that, I built as best I could a GM or MT32? was it patch set for the SQ-80 and and hook it up midi through the sound blaster joystick port…didn’t work too well, but I made an extra special patch for play X-Wing…hehehe. There is another similar project to yours using a yamaha ISA card posted on Hackaday a couple of weeks ago…did you see that one?
Sounds like a lot of fun! The SQ-80 looks like a nice piece of kit, too.
I hadn’t seen the project on Hackaday – very cool! The card used is *very* similar – almost certainly the same thing, just with ISA interface rather than Waveblaster interface. I hunted down the MIDI track used in the demo video and tried it on my setup to verify that the sounds are pretty much identical.
Very nice. Coincidentially i plan to build a small midi add-on for the MIST board since midi has been present on stock atari st units.