In my previous post I talked about FPGAs and the Minimig project. One of the platforms that has received a port of Minimig is the Altera/Terasic DE1 FPGA development board. This is a nice little board which comes with a Cyclone 2 FPGA, 8 meg of SDRAM, some SRAM, some flash and a controller chip to configure the FPGA at power-on. It also has an SD card slot, PS/2 keyboard port, VGA out, an RS232 serial port, an audio codec, some switches, LEDs and a couple of 40-pin general purpose IO headers.
The one downside to this board is that the FPGA is a bit poky, with only about 20,000 logic elements – only just enough to hold the Minimig design, and not large enough to hold the latest 68020 version of the TG68 softcore.
The original DE1 port of Minimig can be found here, while a fork which will hopefully see some new developments in the future can be found here. Binaries are available, and also complete source if anyone’s else is interested in playing with it.
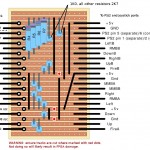
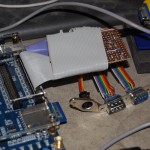
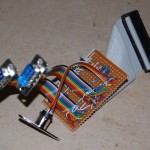
While the DE1 board has a PS/2 keyboard port, there’s no mouse port and (unsurprisingly!) no DB9 joystick ports – so these need to be added via an extra board connected to one of the GPIO headers. The source archives contain a suitable schematic, but since my circuit creation skills don’t yet extend beyond stripboard, I made a stripboard layout for the extra board. The layout and a couple of photos of the completed board appear below: