>>>>>>Acceleration!

Following on from the addition of the Two Way Cache in my last post, I’ve made some more speed improvements to the Chameleon 64’s Minimig core.

Firstly, I’ve added a single-word write buffer, which means when the CPU writes to Fast RAM it doesn’t have to wait for the write to complete.  Provided completing the write takes priority over any potential reads from the same address, and the Cache is updated to reflect the new data, then the CPU can continue merrily processing.

Secondly, I’ve added a second access slot to the SDRAM controller, which means in many cases the wait for RAM service is reduced from a worst-case 24 cycles to 17 cycles.  The downside is that because RAM operations between the two access slots overlap, they can’t be to the same RAM bank.  For this reason I’ve remapped the RAM so that bank 0 contains Chip RAM, Slow RAM, Kickstart ROM and OSD RAM, leaving banks 1-3 free for Fast RAM.  Chip RAM and Kickstart ROM accesses can thus now overlap with Fast RAM accesses.

Finally, I’ve simplified the TG68 wrapper so that it no longer uses the enaWRreg signal to synchronize the CPU to the Amiga’s 28MHz clock.

Between them these changes give an average speed increase of about 65%. Continue reading

DB9s and Matrix Board

One thing I’ve always found annoying when working with DB9s is that the staggered pins makes them incompatible with matrix board.  The simplest solution has always been to just put the DB9 on the end of a cable, and either solder the cable directly to the board, or use a box header, which has parallel rows of pins.

A few days ago I was hit with a flash of inspiration – and now I can’t believe I didn’t think of this solution sooner! Continue reading

Slow progress, but progress nonetheless!

I’ve recently pushed some changed to the TG68MiniSOC Github repo at https://github.com/robinsonb5/TG68_MiniSOC.  Changes this time round include:

  • increasing the system clock frequency to 133MHz.  In order to do this I had to add some wait states to the processor, but the increase in RAM bandwidth makes it worthwhile.
  • Adding some more robust filtering to the PS/2 clock signals.  At the faster clock speed I was finding that the mouse and keyboard were misbehaving – it appeared as though there were spurious clock edges causing the receiver to get a bit or two out of sync with the keyboard and mouse.  After trying various tweaks to the PS/2 module’s parameters with no success, I tried running the PS/2 clock signals through the debouncer I mentioned in the post about latching power circuits – and that seems to work like a charm.
  • Since two of the target platforms have 32 meg of RAM, and since I now have a Platform Specific register the firmware can read to query how much RAM is present, I’ve moved the base address of the hardware registers.  Previously they were at 0x800000, which is 8 megabytes into the address space.  This works out nicely on the DE1 which only has 8 meg of RAM, but on the Chameleon and CIII board the base address needs to be above 32 meg.  So I’ve changed it to 0x80000000 – or 2GB.  Chances are I’m not going to encounter an FPGA dev board with more than 2 gig of RAM! Continue reading

New Amiga games in 2012? Yes indeed!

When I returned to the Amiga scene about a year ago I was amazed to see just how much interest and development there is for retro systems  –  it appears I’m far from alone in believing that computers took a wrong turn back in the 90s!

New games are still being written for a wide variety of retro platforms, and the Amiga is no exception.  Spotting the need for a central hub to highlight new releases, Robert Hazelby has just started a new Blog – Amiga Gamer.  If you’re interested in hearing about new Amiga releases, be sure to check it out.

Success!

I found the source of my Minimig-core problems – one was a misrouting of the SD-card’s chip select signal, and the other was interference from the Action Replay module, which isn’t usable with this version of the core anyway, so I’ve simply disabled it.

The core itself now runs very nicely on the C3 board, with the same basic feature set as the Chameleon core:  On top of the normal Minimig feature set, thanks to the efforts of Tobias Gubener it supports 68020-compatible soft processor, and up to 8 meg of Fast RAM.  My own tweaks to the OSD firmware added support for WinUAE-style HDFs and direct SD card access as well as some other minor tweaks.

There are plenty of further tweaks to be made and problems to solve, but after the frustrations of trying to get it working a few days ago, it’s nice to be able to play some Amiga games on it today!

Here’s Syndicate (courtesy of WHDLoad)

And the workbench from my old A4000, running from an SD card partition.

(The original was DblNTSC.  Interesting that PAL Hi Res should look good on a widescreen monitor!)

Full source and bitstream files for the core are available for download here.

So Close!

Here’s my Cyclone III board nearly running the Minimig core.  For it to be getting as far as this error message means it’s correctly loading and running the OSD firmware from the SD card.  I just have some SPI bugs to iron out, but after that I hope it’ll actually run, and then I can figure out how to give the emulated Amiga access to more of the 32 meg of RAM this board contains.

What will be very interesting is to see whether this version suffers from the same build-to-build stability problems that plague the Chameleon port of the core (since hardware-wise it’s almost identical).  Once again, my ultimate goal is to have multiple ports of the core buildable from a single source tree.

Baby steps towards AGA support

The current publicly available sources for the Minimig project only support the ECS chipset, there’s not yet any support for AGA.  (The Minimig core used by the FPGA Replay board *does*, apparently, have robust AGA support, but the sources haven’t yet been released to the wider world.)

So I decided to have a go at adding a little AGA functionality myself.

Compared with the ECS chipset, the AGA chipset doesn’t actually add that much complexity.  The extra features are basically:

  • Colourtable extended from 32 entries to 256.  There are still only 32 colourtable registers, and they’re accessed in banks, which are selected in another register.
  • Colourtable entries are now 24-bit deep rather than just 12.  A select bit in another register determines whether colourtable writes go to the most- or least-significant 12 bits.
  • There are now 8 bitplanes instead of 6
  • Bitplane data can be exclusive-ored with a mask value.  This enables some neat tricks with “copper chunky” modes, among other things.
  • Sprites can be high-res
  • Data can now be fetched 32-bits at a time, double-pumped or both, giving an effective 64-bit datapath.

The easiest place to start is the colourtables, which in the present Minimig design are stored in registers.  Since the colourtable was about to balloon from 32 12-bit entries to 256 24-bit entries, I migrated the colourtable to a pair of M4Ks – one to take the upper 12-bits of each colour, the other to take the lower 12-bits.

I also implemented enough of the BPLCON3 and BPLCON4 registers to support colourtable bank selection and masking.

I’ve also created a small Copperlist demo in ADF format for testing, which can be found here.

This demo simply uses lower-bit entries and palette masking as a test – the following screenshot shows how it looks under ECS and under AGA.

(Note that while the colourtable entries store 24-bits, they’re still only displayed as 12-bit, because that’s all the DE1 Board’s VGA output can handle without extra dithering, which will come later.)

A git repo containing the current code is here, while a binary can be found here.

Please note that this is highly experimental – there are timing inaccuracies compared with the real chipset, extra-half-brite mode is currently broken. (and the normal Minimig boot text is missing as a result of another experiment to reduce the size of the boot ROM!)

Experimenting with TG68

Part 1: a counter

The TG68 softcore processor is an MC68000-compatible processor core written by Tobias Gubener, and used in the DE1, DE2 and Turbo Chameleon 64 ports of the Minimig project.  The latest version of the core also supports most 68020 instructions,making it a pretty powerful and useful general purpose processor for FPGA applications.

As a learning exercise I wanted to try using the TG68 in a minimal project – a first step towards the “build-my-own-computer” dream I alluded to in an earlier post.

The TG68 consists of two layers – there’s the processor core itself which has a pretty simple interface, then there’s a wrapper which makes it largely signal-compatible with a “real” 68k processor.  For this project I’ve used the wrapper – but later projects will show how the processor can be used “bare”.

To test the processor, I’ve created a very simple program, assembled with Easy68k.

ORG    $0000
    dc.l      $0      ; Initial Stack Pointer
    dc.l      $8      ; Initial Program Counter
START:                ; first instruction of program
    addq.w    #1,d0
    move.w    d0,$dff180
    bra.s    START

    END    START        ; last line of source

This program runs in a loop which increases register D0 by 1 each iteration, and writes the new value to location $dff180.  (This is the location of the background colour register in the Amiga’s custom chipset – so this program, running on an Amiga, would result in a colourful flickering screen, similar to many decrunchers back in the day.)

The minimal program above assembles to a mere 5 words:

$08: $5240
$0A: $33C0
$0C: $00DF
$0E: $F180
$10: $60F6

(Note that the longword at location 0 is the initial Stack Pointer, and at location 4 is the initial Program Counter, so we start the actual program at location 8.)

In the interests of getting the processor up and running with as little effort at possible, I’ve not attempted to run the program from RAM – instead I decode the appropriate addresses directly in VHDL, like so:

process(clk,cpu_addr)
begin
    if rising_edge(clk) then
        if cpu_as='0' then    -- The CPU has asserted Address Strobe, so decode the address...
            case cpu_addr(23 downto 0) is
                -- We have a simple program encoded into five words here...
                when X"000006" =>
                    cpu_datain <= X"0008"; -- Initial program counter.  Initial stack pointer and high word of PC are zero.
                    cpu_dtack<='0';    
                when X"000008" =>
                    cpu_datain <= X"5240";  -- start: addq.w #1,d0
                    cpu_dtack<='0';    
                when X"00000A" =>
                    cpu_datain <= X"33c0";  -- move.w d0...
                    cpu_dtack<='0';
                when X"00000C" =>
                    cpu_datain <= X"00DF";  -- ...
                    cpu_dtack<='0';    
                when X"00000E" =>
                    cpu_datain <= X"F180";  -- ...,$dff180
                    cpu_dtack<='0';    
                when X"000010" =>
                    cpu_datain <= X"60f6";  -- bra.s start
                    cpu_dtack<='0';

                -- Now a simple hardware register at 0xdff180, written to by the program:
                when X"dff180" =>
                    if cpu_r_w='0' and cpu_uds='0' and cpu_lds='0' then    -- write cycle to the complete word...
                        counter<=cpu_dataout;
                        cpu_dtack<='0';
                    end if;

                -- For any other address we simply return zero.
                when others =>
                    cpu_datain <= X"0000";
                    cpu_dtack<='0';
            end case;
        end if;

        -- When the CPU releases Data Strobe we release dtack.
        -- (No real need to do this, provided everything responds in a single cycle.  DTACK Grounded!)
        if cpu_uds='1' and cpu_lds='1' then
            cpu_dtack<='1';
        end if;
    end if;
end process;

When the processor writes to $dff180, the VHDL snippet above captures the value written, and in the full project writes it to the Hex display on the DE1 board.

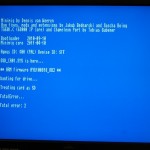
The complete Quartus project can be downloaded here if you’re interested.  It runs fast enough that the hex display appears to just read “8888”, but if you press Key0, which acts as a reset button, you can freeze the display and read off the number.  Signaltap can be used to get a better look at what’s going on:

Minimig on the DE1 dev board

In my previous post I talked about FPGAs and the Minimig project.  One of the platforms that has received a port of Minimig is the Altera/Terasic DE1 FPGA development board.  This is a nice little board which comes with a Cyclone 2 FPGA, 8 meg of SDRAM, some SRAM, some flash and a controller chip to configure the FPGA at power-on.  It also has an SD card slot, PS/2 keyboard port, VGA out, an RS232 serial port, an audio codec, some switches, LEDs and a couple of 40-pin general purpose IO headers.

The one downside to this board is that the FPGA is a bit poky, with only about 20,000 logic elements – only just enough to hold the Minimig design, and not large enough to hold the latest 68020 version of the TG68 softcore.

The original DE1 port of Minimig can be found here, while a fork which will hopefully see some new developments in the future can be found here.  Binaries are available, and also complete source if anyone’s else is interested in playing with it.

While the DE1 board has a PS/2 keyboard port, there’s no mouse port and (unsurprisingly!) no DB9 joystick ports – so these need to be added via an extra board connected to one of the GPIO headers.  The source archives contain a suitable schematic, but since my circuit creation skills don’t yet extend beyond stripboard, I made a stripboard layout for the extra board. The layout and a couple of photos of the completed board appear below: