Part 1: The Plan
One of the projects I have in mind for the PSOC4 chip on the CY8CKIT-049-42xx boards I picked up recently is an adapter to allow 6-button Sega Megadrive controllers to be used on the Amiga. I already made such a device a couple of years ago using a PIC microcontroller but never finished the project (I discovered FPGAs round about then!) and the programmable digital blocks in the PSOC4 make it an ideal platform for resurrecting the project.
Initially I shall read the Sega pad in software, using an interrupt routine, then implement the CD32-pad shift register using the programmable hardware in the PSOC4.
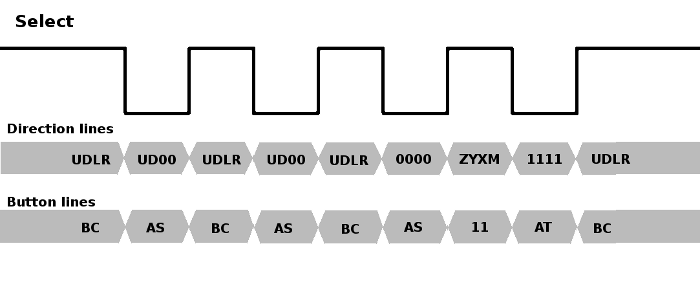
The original Sega Megadrive gamepad had four buttons: A, B, C and Start. The pad used a standard Atari-style 9-pin DSUB connector, and while the four directions and button B were mapped using standard Atari wiring (pins 1,2,3,4,6), button C appeared on pin 9. Most Atari-like gameport connectors have +5v available on pin 7, but the Sega variant has +5v on pin 5. Instead, pin 7 is used as a select signal, which multiplexes the pins normally occupied by the B and C buttons. When the select signal is high, B & C are readable, and when the select signal is low, the status of buttons A and Start appear on those lines instead.
When it came to adding extra buttons to the six button pad, Sega needed to find a way of multiplexing extra buttons in such a way that they didn’t cause compatibility issues. The obvious solution of making extra buttons replace the direction lines when the select signal is low wasn’t possible because the existing 3-button protocol already held the left and right lines low when select was low, presumably so software could distinguish the 3-button pad from a standard Atari-style joystick or Master System controller. Instead they went with a “magic knock” approach, in which software toggles the select line four times in quick succession. The new buttons appear on the directions during the high pulse following the third low pulse, and to identify the pad as a six button button, the direction lines are low and high for the low pulses before and after this, respectively.